Installing Caddy on Windows
Overview
Caddy is a powerful, enterprise-ready web server with automatic HTTPS that makes serving your sites easy. This comprehensive guide covers installation and configuration on Windows systems with proper security configurations, service management, and Cloudflare integration.
What is Caddy?
Caddy is a modern web server that provides:
- Automatic HTTPS: SSL certificates managed automatically
- Reverse Proxy: Route traffic to backend applications
- Static File Serving: Serve websites and files efficiently
- Plugin System: Extend functionality with plugins
- Easy Configuration: Simple, readable configuration files
Key Features
- Zero-Config HTTPS: Automatic SSL certificate provisioning and renewal
- HTTP/2 and HTTP/3: Modern protocol support out of the box
- Reverse Proxy: Load balancing and backend routing
- Static Site Hosting: Perfect for modern web applications
- Plugin Ecosystem: DNS providers, authentication, and more
Prerequisites
Before beginning the installation, ensure your system meets the following requirements:
System Requirements
- Operating System: Windows 10/11 or Windows Server 2019/2022
- Architecture: x86_64 (64-bit)
- RAM: Minimum 512MB (1GB+ recommended)
- Disk Space: At least 100MB free space
- Network: Internet connection for downloading and certificates
Required Permissions
- Administrator access for installation and service setup
Network Configuration
- Static IP address: Your host machine should have a static IP configured for reliable server operation and port forwarding. See How to Set a Static IP on Windows for setup instructions.
- Port access: Ability to bind to ports 80 and 443
- Firewall configuration: Permissions to modify Windows Firewall rules
Installation
Step 1: Download Caddy
-
Visit the Caddy Download Page: Caddy Download Builder
-
Select Required Plugins (if needed):
- For Cloudflare:
github.com/caddy-dns/cloudflare - For DuckDNS:
github.com/caddy-dns/duckdns
- For Cloudflare:
-
Download for Windows:
- Select Windows as the operating system
- Select amd64 architecture
- Download the binary
Step 2: Install Caddy
-
Create Tools Directory: Create directory structure
New-Item -ItemType Directory -Path "C:\Tools\Caddy" -Force -
Extract and Install: Move downloaded caddy.exe to Tools directory
Move-Item "Downloads\caddy.exe" "C:\Tools\Caddy\caddy.exe"Add to system PATH
[Environment]::SetEnvironmentVariable("PATH", $env:PATH, [EnvironmentVariableTarget]::Machine) -
Verify Installation: Check Caddy version
caddy version
Configuration
Step 3: Basic Configuration
-
Create Caddyfile: Navigate to Caddy directory
cd C:\Tools\CaddyCreate basic Caddyfile
New-Item -ItemType File -Path "Caddyfile" -
Basic Caddyfile Example:
# Replace with your domainapp.example.com {reverse_proxy localhost:3000}
Step 4: Running Caddy
Manual Execution
Navigate to Caddy directory
cd C:\Tools\Caddy
Run Caddy with configuration
./caddy run --config Caddyfile
Accept both permissions if Windows Firewall prompts appear upon first run.
Service Installation (Recommended)
For production use, install Caddy as a Windows service using NSSM (Non-Sucking Service Manager):
See: Setting Up NSSM for Caddy on Windows for complete service installation instructions including:
- Automatic startup on boot
- Service monitoring and restart on failure
- Proper logging configuration
- Professional service management
Cloudflare Integration
If you're using Cloudflare for DNS management:
Step 5: Setting up A Name Record
-
Open Cloudflare Dashboard: https://dash.cloudflare.com/
-
Click DNS on the sidebar:

- Click Add a Record:

- Get your external IP from https://ipchicken.com/:

- Click Save
Step 6: Getting an API Key
- Go to Overview in the right-hand menu:

- Scroll down and click "Get API Token":

- Click Create a Token:

You must create a User API Token, not an Account API Token. Cloudflare Account API Tokens will not work for this configuration.
- Select Custom Token:

- Configure Token Permissions:

- Copy your token:

Step 7: Running Cloudflare DDNS
If Using a VPN, following the steps below can break your DNS configuration and make your services unreachable, continue with caution.
Download CloudFlare DDNS
- Download Cloudflare DDNS: CloudFlare DDNS
- Choose the package for your system: Most likely
cloudflare-ddns_v1.1.1_windows_amd64.zip
- Choose the package for your system: Most likely
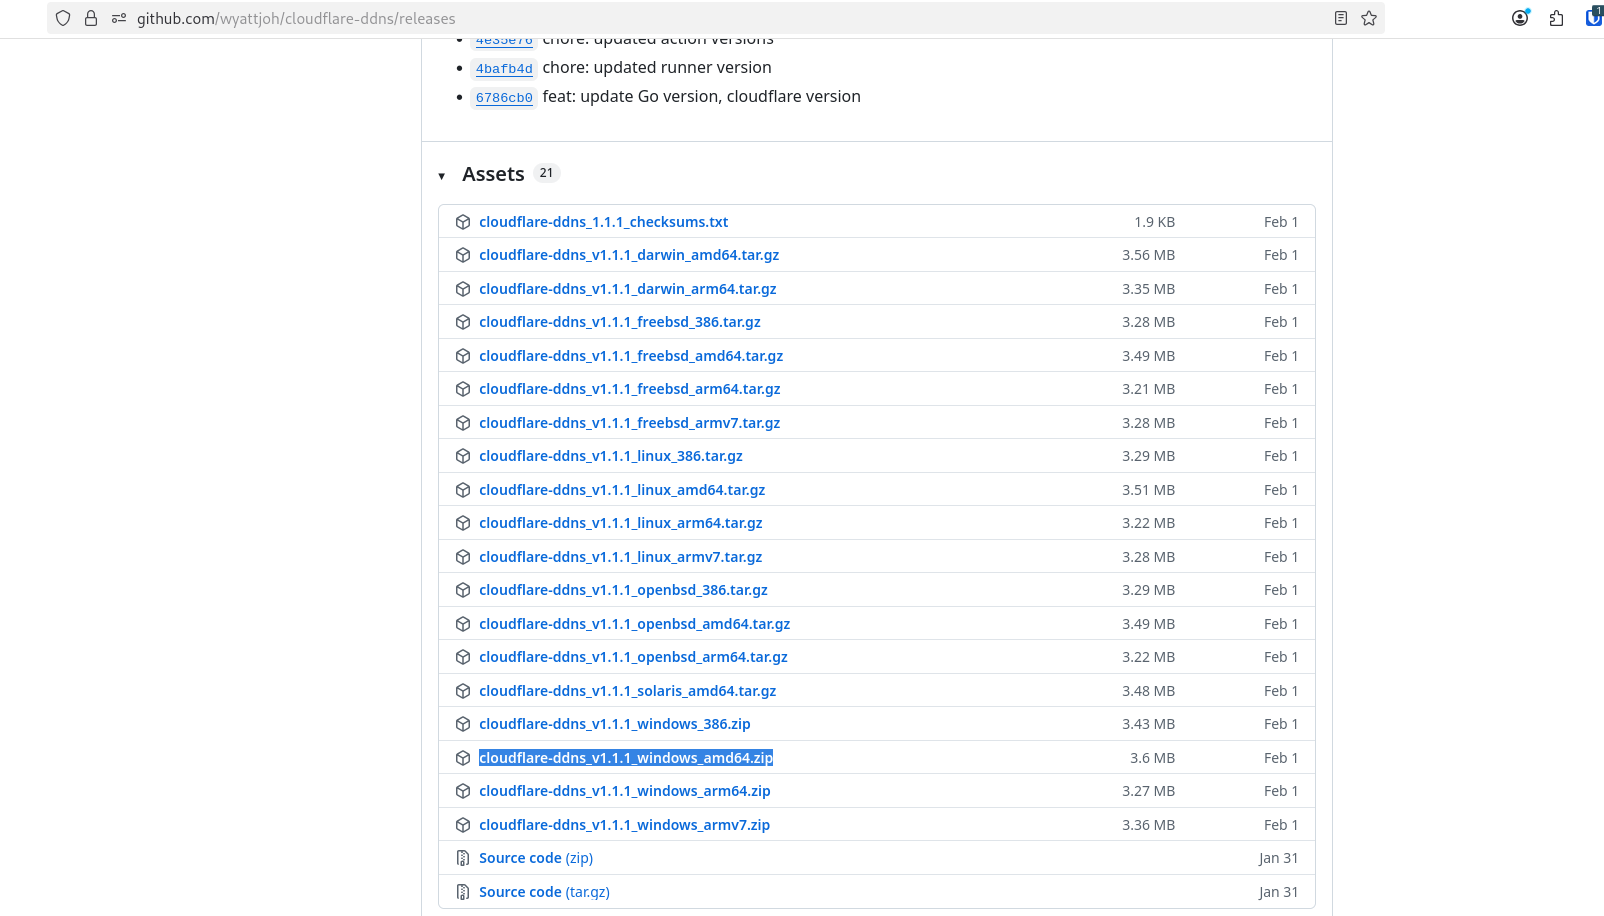
- Extract to directory:
C:\Tools\CloudflareDDNS- The Filepath after being unzipped should be as follows.
C:\Tools\CloudflareDDNS
Download and Setup DDNS Scripts
-
Open a Terminal Window:
- Right click any blank space in the CloudFlareDDNS Directory.
- Click Open in Terminal
-
Download the automated scripts using Powershell:
curl -o cloudflare-ddns-automated.bat https://raw.githubusercontent.com/DevilsDesigns/DemonWarriorTechDocs/main/scripts/Cloudflare/cloudflare-ddns-automated.batcurl -o log-cleanup.bat https://raw.githubusercontent.com/DevilsDesigns/DemonWarriorTechDocs/main/scripts/Cloudflare/log-cleanup.bat
Configure the DDNS Script
-
Open
cloudflare-ddns-automated.batin a text editor and change these lines:cloudflare-ddns-automated.batREM Configuration - Edit these valuesset CF_TOKEN=your-cloudflare-api-tokenset CF_ZONE=yourdomain.comREM Note: CF_ZONE should be your root domain (e.g., demonwarriortech.com)REM Dry-run mode - set to "true" to see what would be updated without making changesset DRY_RUN=trueinfoNote:
DRY_RUNis enabled by default for safety reasons. This allows you to test the configuration without making actual DNS changes. -
Replace the configuration values:
CF_TOKEN: Your CloudFlare API token from Step 6CF_ZONE: Your root domain (e.g.,demonwarriortech.com)- Keep
DRY_RUN=truefor initial testing
Test the Configuration
-
Run the script as Administrator:
- Right-click on
cloudflare-ddns-automated.bat - Select "Run as administrator"
- Accept any Windows Firewall prompts
- Right-click on
-
Check the log file at
./logs/cloudflare-ddns.logfor entries like:========================================[2025-09-20 18:26:11] Starting CloudFlare DDNS update...[2025-09-20 18:26:11] Detecting current public IP...[2025-09-20 18:26:12] DEBUG: Primary IP service failed, trying fallback...[2025-09-20 18:26:12] DEBUG: curl services failed, trying PowerShell fallback...[2025-09-20 18:26:13] Current public IP: 203.0.113.42[2025-09-20 18:26:13] Getting CloudFlare Zone ID for demonwarriortech.com...[2025-09-20 18:26:15] DEBUG: Zone ID: a437cf***********497[2025-09-20 18:26:15] Discovering all A records in zone...[2025-09-20 18:26:17] Analyzing A records for updates...[2025-09-20 18:26:18] DEBUG: Found A record: adguard.demonwarriortech.com -> 198.51.100.10 (Proxied: True)[2025-09-20 18:26:18] INFO: Record needs update: adguard.demonwarriortech.com (198.51.100.10 -> 203.0.113.42)[2025-09-20 18:26:18] DEBUG: Found A record: jellyfin.demonwarriortech.com -> 198.51.100.10 (Proxied: False) -
Verify the results:
- If the new IP matches your current IP, you're ready to proceed
- Change
set DRY_RUN=truetoset DRY_RUN=falsein the script - Run the script again as Administrator to apply the changes
Step 8: Schedule Automatic Updates
-
Set up Task Scheduler for automatic execution:
📋 Manual Task Scheduler Setup Instructions
Step 1: Open Task Scheduler
- Press Win + R, type
taskschd.msc, press Enter - Or search "Task Scheduler" in Start menu
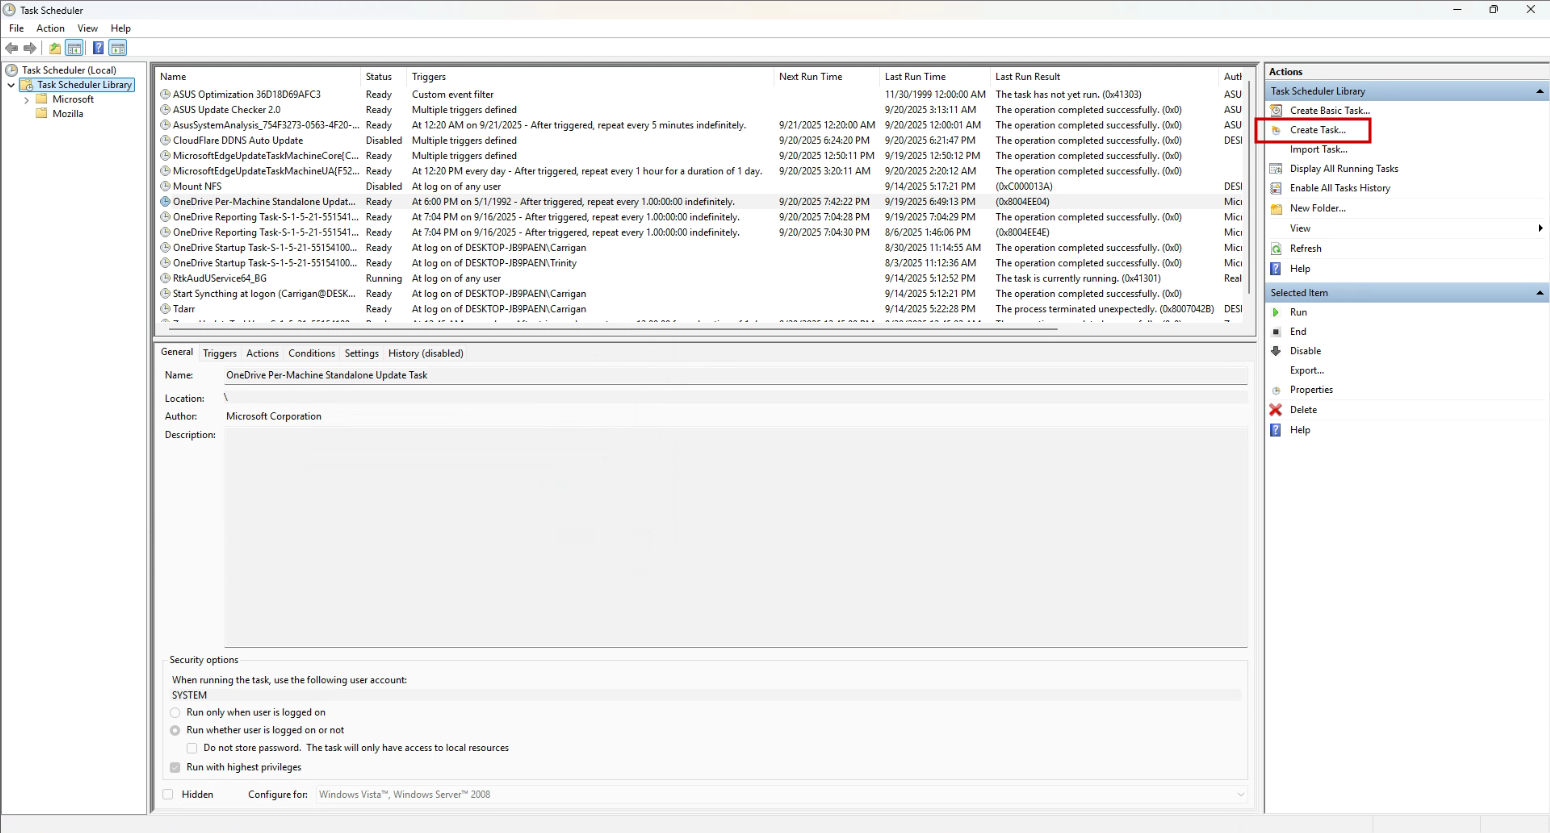
Step 2: Create Task
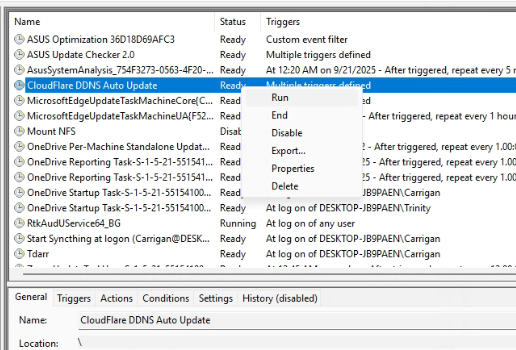
- In the right panel, click "Create Task..." (not "Create Basic Task")
- Name:
CloudFlare DDNS Auto Update - Description:
Automatically updates CloudFlare DDNS every 5 minutes and at startup
- Press Win + R, type
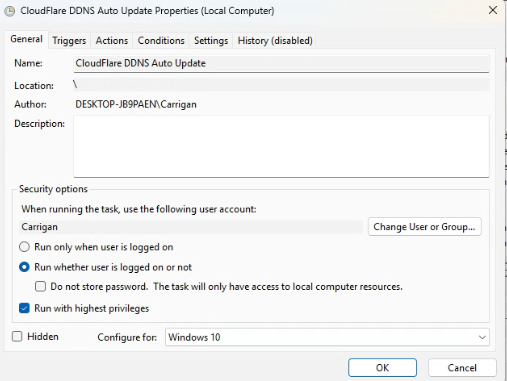
Step 3: General Tab Settings
- ✅ Run whether user is logged on or not
- ✅ Run with highest privileges
- Configure for: Windows 10/11
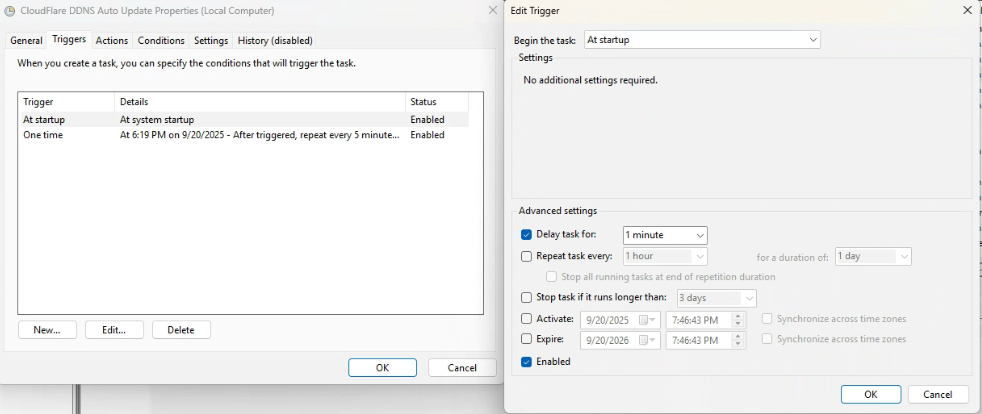
Step 4: Triggers Tab
Click "New..." twice to create 2 triggers:
Trigger 1 - At Startup:
- Begin the task: At startup
- Delay task for: 1 minute
- ✅ Enabled
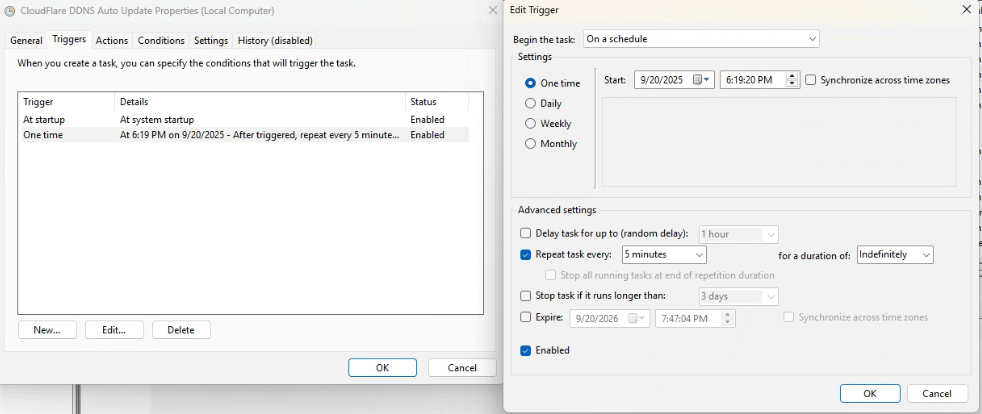
Trigger 2 - Every 5 Minutes:
- Begin the task: On a schedule
- Settings: One Time, start today at current time
- ✅ Repeat task every: 5 minutes
- for a duration of: Indefinitely
- ✅ Enabled
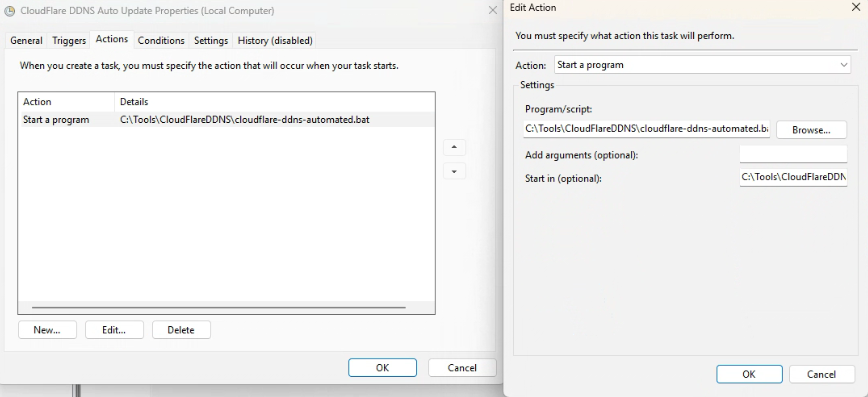
Step 5: Actions Tab
Click "New...":
- Action: Start a program
- Program/script:
C:\Tools\CloudFlareDDNS\cloudflare-ddns-automated.bat - Start in:
C:\Tools\CloudFlareDDNS
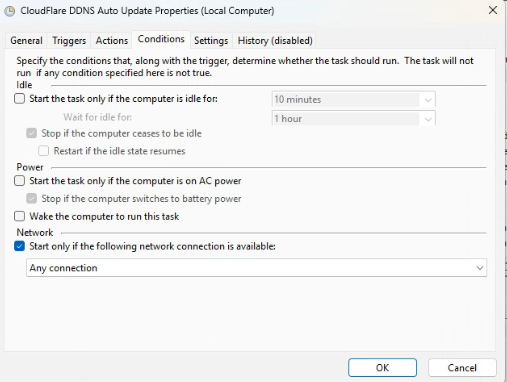
Step 6: Conditions Tab
- ✅ Start only if a network connection is available
- ❌ Start the task only if the computer is on AC power (uncheck this)
- ❌ Stop if the computer switches to battery power (uncheck this)
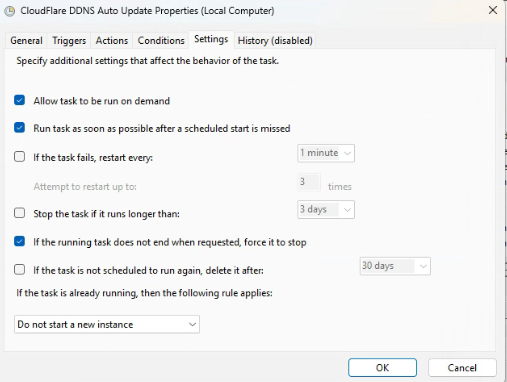
Step 7: Settings Tab
- ✅ Allow task to be run on demand
- ✅ Run task as soon as possible after a scheduled start is missed
- ✅ If the running task does not end when requested, force it to stop
- If the task is already running: Do not start a new instance
Step 8: Finish
- Click OK
- Enter your Windows password when prompted
- Task is now created!
Test the task: Right-click the task → "Run"
Check logs: C:\Tools\CloudFlareDDNS\logs\cloudflare-ddns.log
Your DDNS will now update automatically every 5 minutes! 🚀
Maintenance
-
Log cleanup (optional):
- Run
log-cleanup.batperiodically to manage log file sizes - Or set up another scheduled task to run it weekly
- Run
-
Monitor the service:
- Check logs regularly:
C:\Tools\CloudFlareDDNS\logs\cloudflare-ddns.log - Verify DNS records are updating correctly in CloudFlare dashboard
- Test your domain resolution periodically
- Check logs regularly:
Service Management
Windows Service Commands
Start Caddy service
net start caddy
Stop Caddy service
net stop caddy
Restart Caddy service
net stop caddy && net start caddy
Check service status
sc query caddy
Configuration Management
Test configuration before applying
caddy validate --config C:\Tools\Caddy\Caddyfile
Format Caddyfile
caddy fmt --overwrite C:\Tools\Caddy\Caddyfile
Reload configuration
caddy reload --config C:\Tools\Caddy\Caddyfile
View current configuration
caddy config --config C:\Tools\Caddy\Caddyfile
Troubleshooting
Common Issues
Issue 1: Service Won't Start
Check Windows Event Logs
Get-EventLog -LogName Application -Source Caddy -Newest 10
Check service status
sc query caddy
Common causes:
- Configuration syntax errors
- Permission issues
- Port conflicts
Solution: Validate configuration
caddy validate --config C:\Tools\Caddy\Caddyfile
Check file permissions
Get-Acl C:\Tools\Caddy\Caddyfile
Test manual execution
Move to Caddy.exe Folder Directory
cd C:\Tools\Caddy
Run Caddy command inside Caddy folder
./caddy run --config Caddyfile
Issue 2: Firewall Blocking
Check Windows Firewall rules
Get-NetFirewallRule -DisplayName "*Caddy*"
Add firewall rules if needed
New-NetFirewallRule -DisplayName "Caddy HTTP" -Direction Inbound -Protocol TCP -LocalPort 80 -Action Allow
New-NetFirewallRule -DisplayName "Caddy HTTPS" -Direction Inbound -Protocol TCP -LocalPort 443 -Action Allow
Issue 3: Certificate Issues
Check certificate status
caddy list-certificates
Clear certificate cache if needed
Remove-Item -Recurse -Force "$env:APPDATA\Caddy\certificates"
Security Best Practices
File Permissions
Secure Caddy directory
$acl = Get-Acl "C:\Tools\Caddy"
$acl.SetAccessRuleProtection($true, $false)
$accessRule = New-Object System.Security.AccessControl.FileSystemAccessRule("Administrators","FullControl","Allow")
$acl.SetAccessRule($accessRule)
Set-Acl "C:\Tools\Caddy" $acl
Firewall Configuration
Enable Windows Firewall
Set-NetFirewallProfile -Profile Domain,Public,Private -Enabled True
Configure specific rules
New-NetFirewallRule -DisplayName "Caddy HTTP" -Direction Inbound -Protocol TCP -LocalPort 80 -Action Allow
New-NetFirewallRule -DisplayName "Caddy HTTPS" -Direction Inbound -Protocol TCP -LocalPort 443 -Action Allow
Next Steps
Advanced Configuration
- Explore advanced directives:
header,encode,rate_limit - Set up monitoring: Windows Performance Counters, health checks
- Configure logging: Custom log formats and Windows Event Log integration
- Implement security headers: HSTS, CSP, X-Frame-Options
Integration Examples
- IIS Integration: Run alongside IIS for specific applications
- Docker Desktop: Reverse proxy to Windows containers
- Load balancing: Distribute traffic across multiple Windows servers
- API gateway: Route and transform API requests
Resources
- Official Documentation: caddyserver.com/docs
- Community Forum: caddy.community
- Configuration Examples: Caddy Examples
Summary
You have successfully installed Caddy on Windows with:
✅ Professional installation with proper directory structure
✅ Windows service integration for automatic startup
✅ Automatic HTTPS capability with zero configuration
✅ Cloudflare integration for dynamic DNS management
✅ Security best practices - Proper permissions and firewall rules
✅ Production-ready configuration - Enterprise deployment ready
Your Caddy installation is now ready for production use with automatic HTTPS, robust security, and professional service management on Windows.
💻️Buy me a PC Part